Back to Basics: Eggs in Anchovy Cream

Print

Back to Basics: Eggs in Anchovy Cream

Part of winding down my graduate studies has been a return to exploring new recipes at home. The time constraints of a full-time job and a part-time graduate program had lead to a more narrow set of meal options than usual. Now, free of that, I’ve taken to picking up occasional recipes from Instagram folk, like Corre Larkin, or cookbook authors (Jon Kung or Khushbu Shah).

What I like about food social media during this phase is the “share and share credit” approach. Corre posted a short video of Eggs in Anchovy Cream Sauce, crediting April Bloomfield, showing the approach and introducing me to a chef (and her book).

This recipe comes together quickly and is great with some sourdough “soldiers”.


Finished dish, depicting two eggs in anchovy cream sauce.

  • Author: Austin Brower
  • Prep Time: 5
  • Cook Time: 15
  • Total Time: 20 minutes
  • Yield: 2 1x

Ingredients

Scale
  • 1 (large) garlic clove (crushed, peeled, and finely chopped)
  • 1tsp fresh tarragon leaves
  • 1T unsalted butter
  • 2 and a half whole anchovy fillets (rinsed)
  • 6T heavy cream
  • 1/4 tsp finely grated lemon zest
  • Some paprika
  • 4 eggs

Instructions

Preheat oven to 400degF

Prepare a bain-marie with an oven proof 9″x13″ casserole dish.

  1. In a smaller saucepan, add 1T unsalted butter and bring to foam on medium-high heat.
  2. Add finely chopped garlic and allow to slightly brown (while stirring) ~1min.
  3. Turn off heat and add rinsed anchovies, breaking them up with a spoon or spatula.
  4. Add cream and lemon zest and stir to combine.
  5. Snip in tarragon leaves to your taste.
  6. Bring to boil on medium-high heat and then remove.

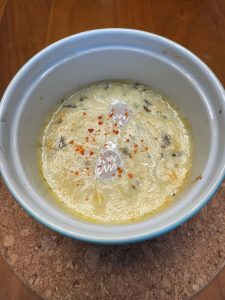
As the anchovy cream sauce slightly cools, prepare two large ramekins by rubbing butter on the inside to prevent sticking.

Add anchovy cream sauce to the ramekins, then crack in two eggs into each ramekin.

Top with some chili salt or paprika.

Place ramekins into the bain-marie ( I used boiling water ) and place into the oven.

Bake about 15 minutes, remove, and then allow to carry over cook while toasting some bread!

Top with some additional tarragon if desired and serve alongside sourdough bread “soldiers”; dip in and consume.

Notes

I used two larger ramekins for this, each of which easily held two eggs and the anchovy cream compound.

As ovens may vary, keep in mind that you’re trying to get a runny yolk or jammy yolk. I found longer than 15 minutes in the oven lead to yolks that were just a little too done.

Did you make this recipe?

Share a photo and tag us — we can’t wait to see what you’ve made!

Making Danish Aebelskivers

Over the past three years, my housemate Ted has been acquiring more and more Lodge cast iron cookware. The collection has grown to about a dozen different pieces, from chicken fryer to wok. The latest addition is an obscure and extremely specific piece of cookware called a Danish æbelskiver pan.

Aebelskiver Pan

Aebelskiver Pan

The æbelskiver is a Danish desert which is akin to a pancake ball. Traditionally, they would include a little bit of apple (æbel) inside, but we did not attempt that for our first time out. Not too terribly sweet themselves, these light and deliciously buttery puffballs would go well with jam and powdered sugar. We skipped the jam and just used maple sugar.

Danish Aebelskivers (courtesy Lodge)

Yield: 4 servings

Ingredients

  • Mix Dry Ingredients
  • 2 Cup
    Soft wheat flour (or unbleached flour or half and half)
  • 1/2 tsp
    Salt
  • 2 tsp
    Baking Powder
  • 1/4 tsp
    Baking Soda
  • 1 tsp
    Cinnamon
  • 2 tbsp
    Sugar (we used Maple Sugar)
  • Mix Wet Ingredients
  • 1 3/4 Cup
    Buttermilk
  • 1/4 Cup
    Frangelico (Hazelnut Liquor)
  • 2
    Egg Yolks (reserve white in separate bowl)
  • 1 tsp
    Vanilla

Cooking Directions

  1. After separating the eggs, beat the white until stiff peaks.
  2. Combine dry and wet ingredients until smooth then gently fold in beaten egg whites.
  3. Bring the aebelskiver pan to medium (or just below) heat and then add 1/2 tsp of butter into each cavity. Once the butter has melted, spoon in enough batter to partially fill the cavity (generously rounded tablespoon).
  4. Allow the batter to cook until crispy on the sides (the signs to look for are slight bubbling within the batter and cupping). Then use a skewer or chopstick to loosen the aebelskiver from the side of the cavity and spin about a quarter turn.
  5. Repeat the turning procedure approximately every minute until the outside of the aebelskiver is uniformly golden brown and delicious.
  6. Remove from the pan, dust with maple sugar, and serve hot!

So buttery!

So buttery! 

Ready to eat.

Ready to eat.

Food adventures.

Back in 2012, I first visited Pai Men Miyake and raved about their noodles and pork buns. Since then, I’ve returned multiple times and sampled additional menu items. My most recent visit I ventured into trying the brussels sprouts. The sprouts, quickly deep fried and tossed with a fish sauce vinaigrette, cilantro, and mint, are a delightfully salty complement to beer. The dish was quickly demolished. Later, my friend Jim Troutman joined me and had already discovered how tasty the sprouts are. It was a great time.

Brussels  CutToday, I had to deal with my collection of brussels sprouts that are taking up space in the fridge. Harkening back to my last visit to Pai Men Miyake, I decided to try my own version of their deep fried sprouts. I prepared the sprouts and cut the larger ones in half.

One of my housemates recently purchased some grape seed oil. I have had a hankering to try it out and it’s supposed to be a good frying oil — in the cast iron it went! I set the stovetop at about medium heat and let the pan and oil come up to temperature. Then, I added the brussels in small batches. The first batch, of course, ended up a little darker than I wanted, but the second looked great! For best effect, a couple un-cut small brussels sprouts should be allowed to cook through — they’ll have a nice “pop”.Frying Brussels

At the suggestion of Morgan, the first attempt was a mix of Maine maple syrup, soy sauce, ginger, and a little sriracha. Totally delicious, but a little too salty. The second, again tweaked by Morgan, contained Maine maple syrup, worcestershire sauce, ginger, and more sriracha.

The third version, to my mind, ended up a total winner. It contained a dab of ginger paste, about half a tablespoon of maple syrup, soy sauce, and rice vinegar, and sriracha to taste.

Cooked Brussels Dressed

Needless to say, the brussels sprouts disappeared into hungry mouths rather quickly.

Since I had left over frying oil, I took a couple chicken breast cutlets, coated them in mayonnaise and chipotle panko, and gave them a quick fry. The chicken ended up moist on the inside and had a nice crunch on the outside. The oil was a little too hot for the panko, but the slight burning didn’t spoil the dish too much.

Chipotle Panko coated Chicken with Brussels Sprouts


Potstickers / Gyoza

One of my absolute favorite “party foods” are potstickers, also known as gyoza or pork dumplings. These little snacks cook quickly, are a breeze to prepare, and are consumed like candy.

I suggest using a sheet pan to store the dumplings and a non-stick frying pan with a tight fitting lid for cooking. You can prepare a batch of dumplings ahead of time and cook them to order — and you really should, because these are best consumed right off the stove (and they usually don’t stay on a serving plate too long because they’re too tasty!).

[amd-recipeseo-recipe:5]

Posted in Uncategorized | Tagged

Mom’s Vegetarian Spaghetti

I have very fond memories of this recipe. I’m not sure of its provenance, but my mother would cook it often and when the nutmeg was introduced into the pan, the scent would waft through the house and call the family to dinner.

[amd-recipeseo-recipe:4]

Posted in Uncategorized | Tagged